Below you will find a digital copy of much of the documentation for the Extended Math Utilities library. The complete and downloadable version of the documentation can be found here:
To use this plugin all you need to do is install it to the engine or project. From there, activate the plugin in your project via the plugin menu. And you’re done!
Once the plugin is activated in the project you will have access to all the nodes in any blueprint class (actors, controllers, AI, etc.).
Step 1: Install the Plugin
- After purchasing the plugin from Epic Marketplace, you will find a copy of it in your vault (under the “library” tab).
- Select “Install to Engine” and select the appropriate version.
Step 2: Activate the Plugin
- Go to Edit > Plugins.
- Search for “Math” and select the plugin.

- You now have the plugin activate for the project.
Step 3: Test by creating any blueprint (or use an existing one)
- Go to where you want in your project to create a test blueprint. For this tutorial I suggest an actor (though you can do this through any blueprint you already have).
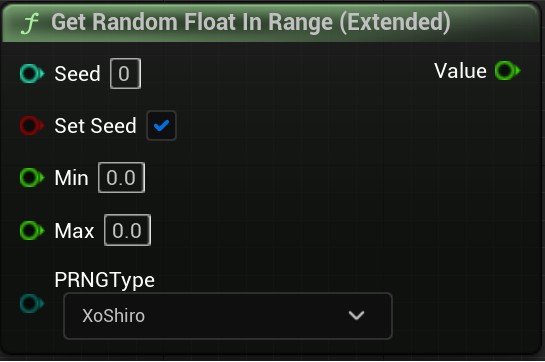
- Now, let’s test that the plugin is working, let’s generate a random number. Search for “Get Random Float in Range”

- First, let’s make sure that the settings are correct:
- Put any value in “Seed”
- Ensure that “Set Seed” is marked as true
- Set “Min” of 0
- Set “Max” to 100.
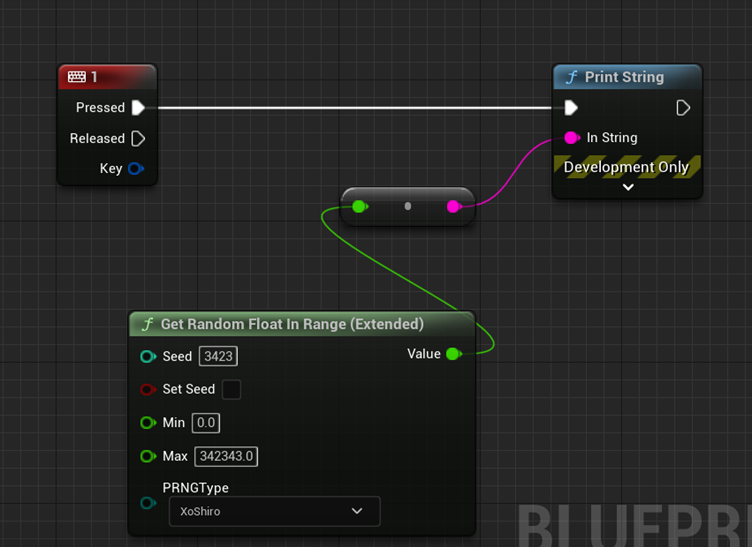
- Add a “Print String” node and plug “value” from the Get Random Float in Range into “In String” of the print string node.
- Right click the graph and type in “1 key” and look for the ‘”1” under “keyboard events” and add it to the graph.
- Attach the execute from “Pressed” from the “1” event into the print string.
 (Note this picture does not have ‘Set Seed’ set to true, but it should).
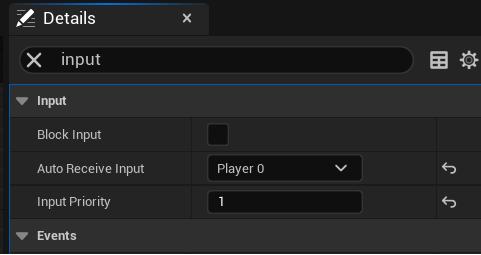
- From the content panel on the left (in the default layout), select the object at the top of the panel – the “(self)” and then go to the details panel on the right (in the default layout).
- In the details panel type in ‘input’
- Set ‘Auto Receive Input’ to ‘player 0’

- Place the actor in the world
- Test the random number generator by pressing ‘1’ and then repeat to see if the number is the same (as we are using a pre-determined seed).
- Repeat the process with ‘Set Seed’ to false, to ensure you are getting a random number each time you press ‘1’ and if you are the plugin should
Step 1: Install the Plugin
- After purchasing the plugin from Epic Marketplace, you will find a copy of it in your vault (under the “library” tab).
- Select “Install to Engine” and select the appropriate version.
(For those with a loose copy, find your Engine’s plugin folder or create a Plugin folder for your project and copy the ExtendedMathUtilities folder in).
Step 2: Activate the Plugin
- Go to Edit > Plugins.
- Search for “Math” and select the plugin.

- You now have the plugin activate for the project.
Optional: In the content browser, select ‘View Engine Content’ (it may be under ‘View Plugins’ if you installed a loose version to your project instead). You will not need access to the class files to use this plugin in blueprint.
Step 3: Add the header
- Open any header (.h) or implementation (.cpp) that you want to have access to the functions.
- Add “FMathUtils.h” (and any required pathing) to your file (the other header with this plugin is for the blueprint library).
- Now using the appropriate namespace “FMathEx” you can execute any of the functions in the library.
This section is for those wanting to expand the Genetic Algorithm tools provided in this plugin.
Step 1: Locating Fitness Functions
- Open FMathUtils.h
- Locate the GoodnessOfFit function inside of the struct FGeneticSolution (approx. around line 1187).
Step 2: Updating or adding new objective function
- You can override any of the simple objective functions as you see fit (I would suggest, that if you do, you update the DisplayName in “EGeneticAlgorithmObjectiveFunctionsTypes” if you do).
- But, let’s assume you want to add your own with minimal effort. Just below the GoodnessOfFit function you will notice that there is the fitness for the travelling salesman problem (called “TPSFitness”) and below that are three “empty” (outside of UE_LOG) functions for custom fitness checks.
- Add any objective function you want to one of these.
- Now, when you set the ‘ObjectiveFunc’ in C++ or using the “Run Genetic Algorithm” node in BP make sure to call up the correct objective function.
