Below you will find a digital copy of much of the documentation for the Advanced RTS Camera (ARTSC). The complete and downloadable version of the documentation can be found here:
NOTE: If you are in an older version of UE4 or in UE5.0 you can still use the quick start guide. You will just need to follow the instructions for updating the input bindings (see Step 4 and Step 5 of Getting Started)
- Make sure you can see Plugins
- Navigate to the Advanced RTS Camera plugin folder
- Go to the Camera subfolder
- Drop the provided pawn onto any map. (You’re done at this step)
- Update settings as you see fit. (Details below).
Step 1: Install the Plugin
- After purchasing the plugin from Epic Marketplace, you will find a copy of it in your vault (under the “library” tab).
- Select “Install to Engine” and select the appropriate version.
(For those with a loose copy, find your Engine’s plugin folder or create a Plugin folder for your project and copy the ARTSCamera folder in).
Step 2: Activate the Plugin
- Go to Edit > Plugins.
- Search for “RTS” and select the plugin.

- You now have the plugin activate for the project.
Optional: In the content browser, select ‘View Plugins’ (it may be under Engine Content if you installed a loose version to the engine instead). For this tutorial you will not need access to the plugins folder. You could do this step to see if the install worked correctly.
Step 3: Create a RTS Pawn
- Go to where you want to create the pawn.
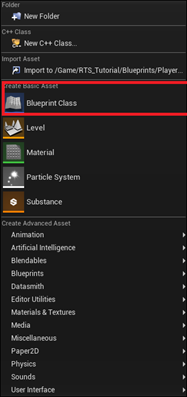
- Right click, select “Blueprint Classes”
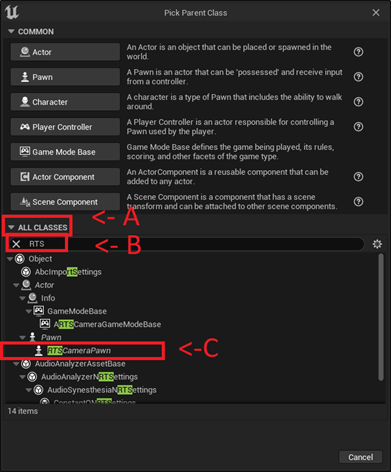
- Under “All Classes” search for “RTS” and select “RTS Camera Pawn”.
Step 4: Create key bindings (Pre 5.1)
Only do this step if you are using 5.0 or older AND if you are not using the enhanced input plugin.
The example does not use key bindings (you can find the example in the content section of the plugin, and a note that says do not use my setup as well as an example of what the setup should look like after this step).
- Go to Project Settings
- In Project Settings go “Inputs” (under the Engine) category
- Set up both your axis mappings and input bindings (Example setups provided below)
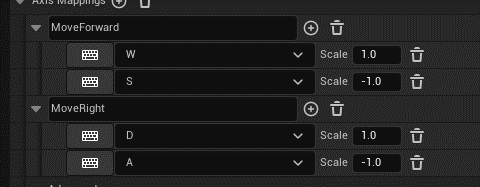
I recommend having the following axis mappings (but this based on the features you want to use):
Name | Key(s) | Value |
MoveForward | W | 1 |
S | -1 | |
MoveRight | D | 1 |
A | -1 |
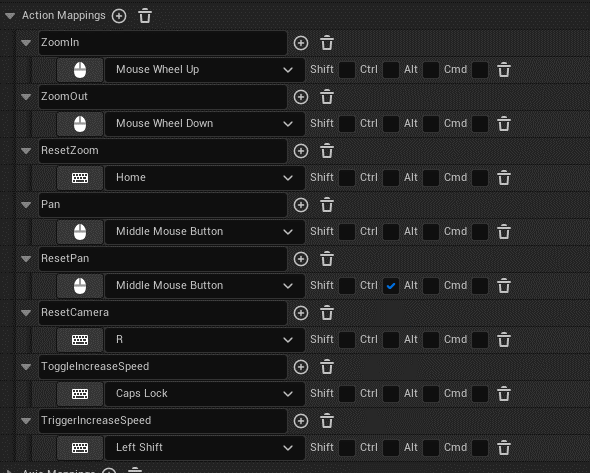
I recommend having the following input bindings (but, again, these are based on features you want to use):
Name | Key |
ZoomIn | Mouse Wheel Up |
ZoomOut | Mouse Wheel Down |
ResetZoom | Home |
Pan | Middle Mouse Button |
ResetPan | Middle Mouse Button + Ctrl |
ResetCamera | R |
ToggleIncreaseSpeed | Caps Lock |
TriggerIncreaseSpeed | Left Shift |
PrimaryInput* | Left Click |
Step 4: Create key bindings (5.1+)
Only do this step if you are using 5.1 OR you are using the enhanced input plugin (in older versions of Unreal). Remember, 5.1 deprecates the old system and uses the enhanced inputs system.
The plugin already has this completed for you. You can skip this step, or you can open the example in the plugin to dissect how movement is achieved.
Step 5: Implement Input Events (pre 5.1)
Only do this step if you are using 5.0 or older AND if you are not using the enhanced input plugin.
This step can be done either in the pawn directly or in your player controller or combined across both. If you want additional support outside of the scope of this plugin (e.g., using player controller to implement events for the pawn) then contact me.
N.B., Example implementations can be found in the Demo Pawn included. You could use the demon pawn and change out the key event nodes for the input event nodes.
For this step we will be implementing the events in the RTS pawn itself.
- Open the pawn you created in Step 3.
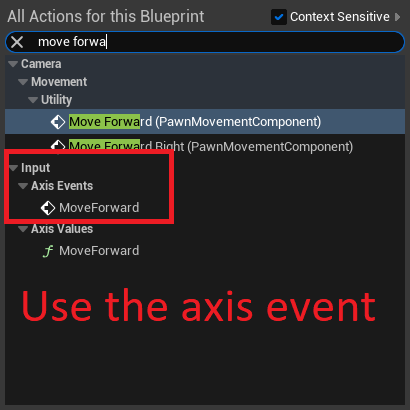
- Right click anywhere on the graph and search for “MoveForward” (or whatever you named it). Put it on the graph
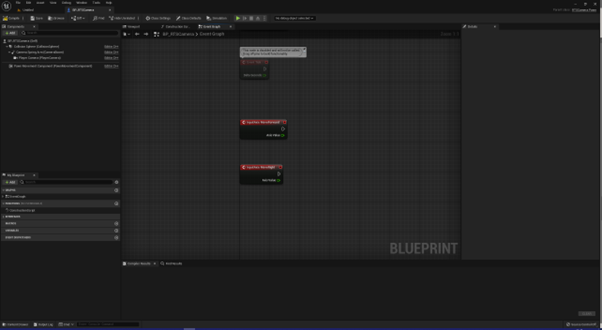
- Search for “MoveRight” (or whatever you named it). Put it on the graph.
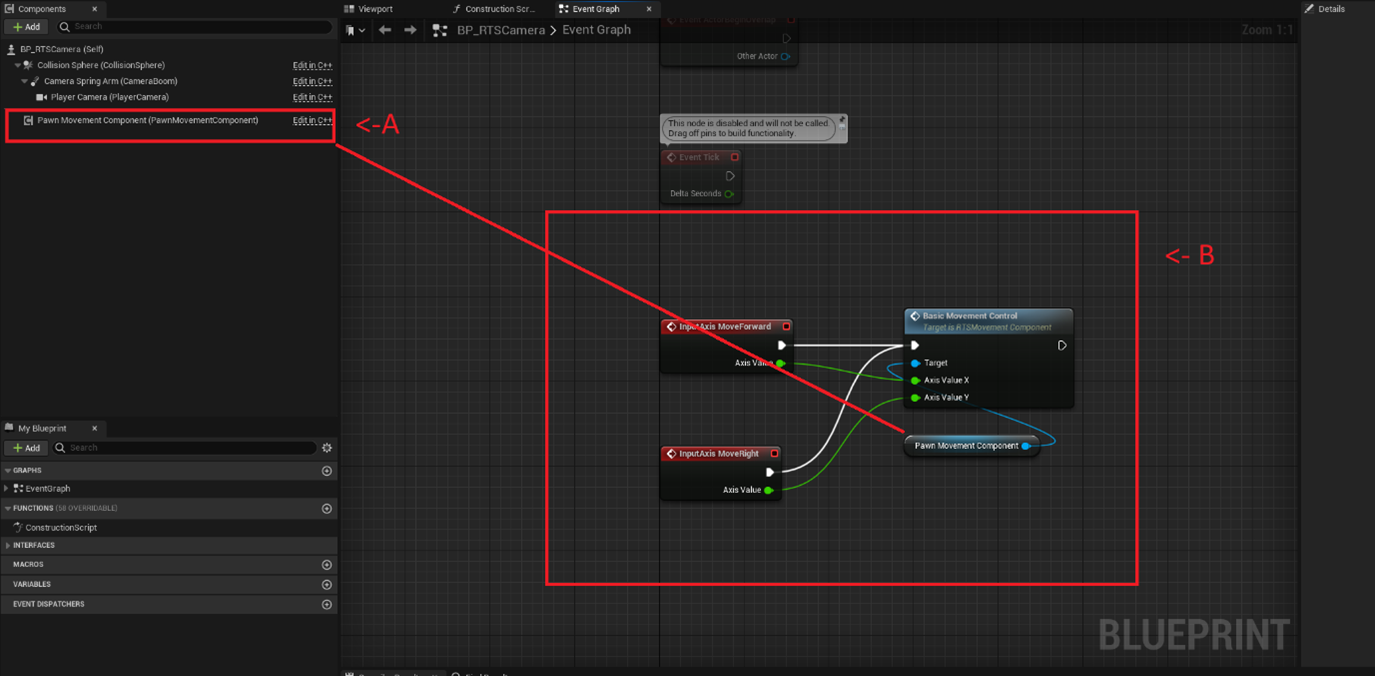
- Take the RTS Movement Component (from the component tree on the left) and place it as a getter on the graph.
- From the RTS movement component search for BasicMovementControl and place it on the graph.
- Attach the executes from both the MoveForward and the MoveRight to the BasicMovement node.
- For the AxisValueX pin, attach the axis value from MoveForward.
- For the AxisValueY pin, attach the axis value from MoveRight.
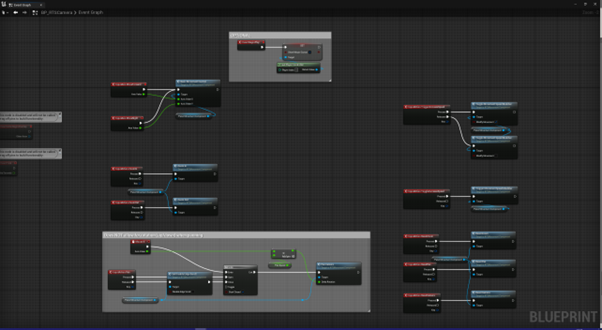
- Repeat this process for all other features you want to include (see the list of node names for various feature implementation listed below).
- IF YOU ARE USING CURVES, select your blueprint “(self)” on the components tab, make sure “Class Defaults” is select, and then go to Camera -> Zoom and add your curves in (the default names should match the curve type if you are using the provided curves).

- IF YOU WANT TO FADE OBJECTS, Select your blueprint “(self)” on the components tab, make sure “Class Defaults” is selected, and then go to Camera->MaterialFade and add thee “Fade Material” (I use MI_fade, provided for in this plugin).

Step 5: Implement Input Events (5.1+)
Only do this step if you are using 5.1 OR you are using the enhanced input plugin (in older versions of Unreal). Remember, 5.1 deprecates the old system and uses the enhanced inputs system.
The plugin already has this completed for you. You can skip this step, or you can open the example in the plugin to dissect how movement is achieved.
The implementation is in the demo camera.
Step 6: Test
- Once you are ready, go ahead and test to make sure that the pawn is correctly set up.
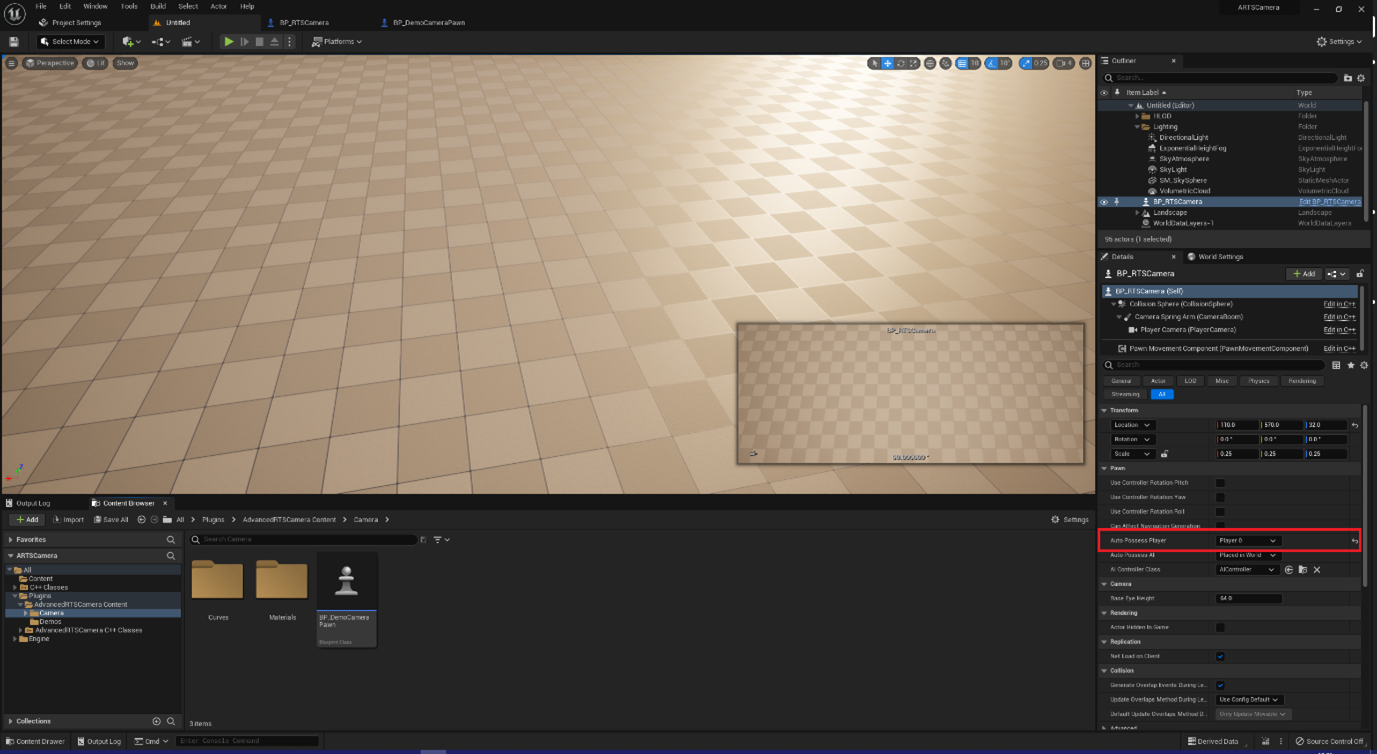
Make sure that the pawn is set to be possessed by the player if you are not updating your GameMode or APlayerController.
Getting Started (C++)
N.B., This set of instructions is only for generating a derived C++ class from within the editor. If you want to generate the class from your IDE, I trust that you know how to work with your IDE to do so (that and there are different IDES devs use, so I cannot reasonably write an approach for all of them).
Step 1: Install the Plugin
- After purchasing the plugin from Epic Marketplace, you will find a copy of it in your vault (under the “library” tab).
- Select “Install to Engine” and select the appropriate version.
(For those with a loose copy, find your Engine’s plugin folder or create a Plugin folder for your project and copy the ARTSCamera folder in).
Step 2: Activate the Plugin
- Go to Edit > Plugins.
- Search for “ARTS” and select the plugin.
- You now have the plugin activate for the project.
Optional: In the content browser, select ‘View Plugins’ (it may be under Engine Content if you installed a loose version to the engine instead). For this tutorial you will not need access to the plugins folder. You could do this step to see if the install worked correctly.
Step 3: Create a RTS Pawn
- Navigate to you source folder in the project.
- Right click and add new class.
- Select “Show All Classes”
- Search for RTS and create the pawn.
- Reload and recompile the project.
Step 4: Create key bindings (pre 5.1)
Only do this step if you are using 5.0 or older AND if you are not using the enhanced input plugin.
The example does not use key bindings (you can find the example in the content section of the plugin, and a note that says do not use my setup as well as an example of what the setup should look like after this step).
- Go to Project Settings
- In Project Settings go “Inputs” (under the Engine) category
- Set up both you axis mappings and input bindings (Example setups provided below)
I recommend having the following axis mappings (but this based on the features you want to use):
Name | Key(s) | Value |
MoveForward | W | 1 |
S | -1 | |
MoveRight | D | 1 |
A | -1 |
I recommend having the following input bindings (but, again, these are based on features you want to use):
Name | Key |
ZoomIn | Mouse Wheel Up |
ZoomOut | Mouse Wheel Down |
ResetZoom | Home |
Pan | Middle Mouse Button |
ResetPan | Middle Mouse Button + Ctrl |
ResetCamera | R |
ToggleIncreaseSpeed | Caps Lock |
TriggerIncreaseSpeed | Left Shift |
PrimaryInput* | Left Click |
* I use the name “PrimaryInput” as in an RTS game I will want my left (and right) click to do multiple things. If you are only going to use this to track or interact with objects use a name that makes sense to you.
Step 5: Implement Input Events
This step can be done either in the pawn directly or in your player controller or combined across both. If you want additional support outside of the scope of this plugin (e.g., using player controller to implement events for the pawn) then contact me.
For this step we will be implementing the events in the RTS pawn itself.
- Open the pawn you created in Step 3.
- Create methods that will call up the relevant functions (they are all in the component, a reference is included in this class. Use “PawnMovementComponent”; e.g. PawnMovementComponent ->BasicMovementControls(X, Y)).
- Implement the relative functions you just created.
- Add the event dispatchers to the class, associating the appropriate ones to the methods you just created.
- (This method is not overridden in the pawn, so you do not need to worry about anything I might have included. But, still make sure to include your super() in any function that comes from Epic).
Step 6: Test
- Once you are ready, go ahead and test to make sure that the pawn is correctly set up.
This section will provide an example for how to add a trace channel for the Terrain. In this section we will: 1) Add the channel to the project; 2) Update our pawn to look for that channel; 3) update our Landscape to use that channel.
Step 1: Add Trace Channel
- Go to Edit > Project Settings
- In Project Settings go to “Collision” (under Engine)
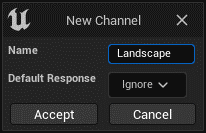
- Select “New Trace Channel”

- Name the trace channel what you want (I named my “Landscape”)
- Set the Default Response to “Ignore.”

Step 2: Update Pawn
- Open the pawn
- Make sure “(self)” is selected
- Make sure Class Defaults is selected
- Go to Settings>Camera>HeightAdjustment
- Under “Camera Height Channel” Select the new channel you made (in my case “Landscape”)
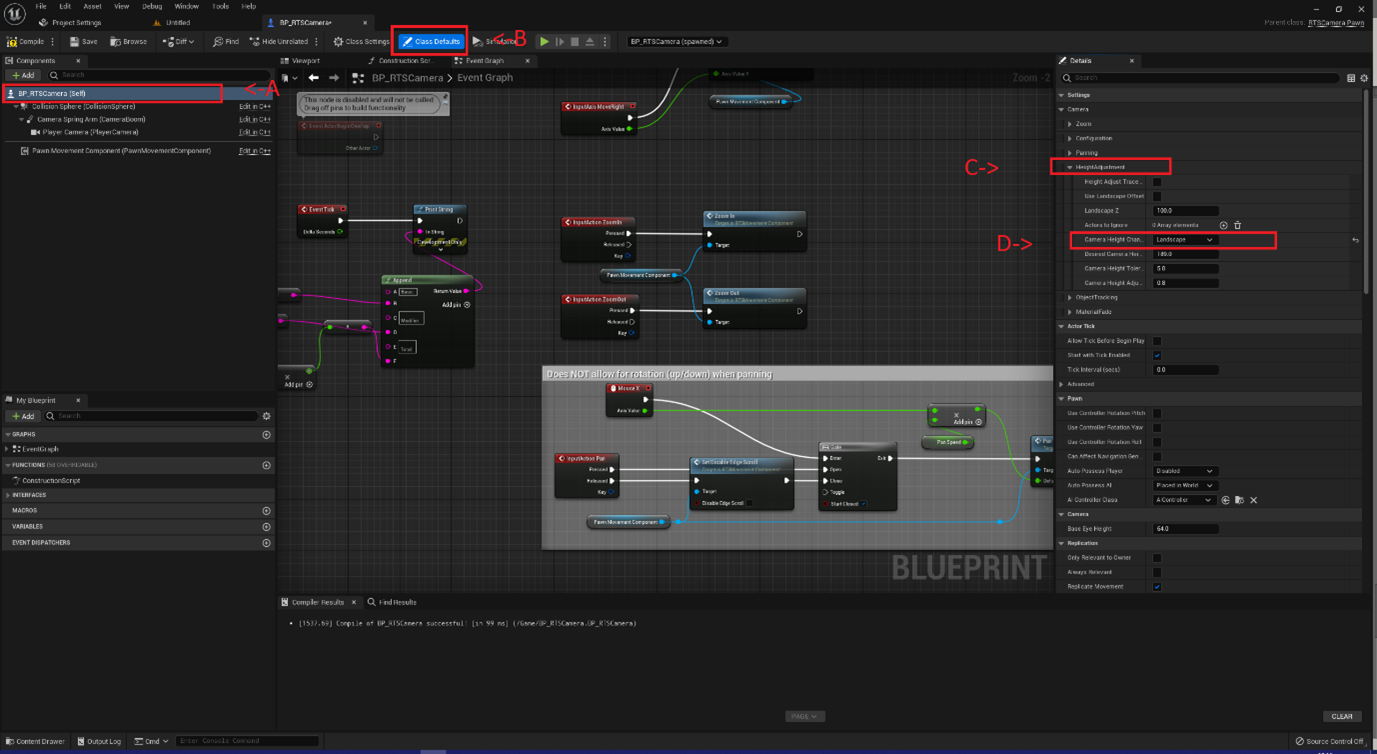
- If you test it now, it will crash eventually (the pawn will fall through the map)
- Select “Collision Sphere” from the left
- In the details panel find your collision, set your “Collision Presets” to “Custom…”
- Set “Landscape” to Block

Step 3: Update Landscape
- Go back to your level editor and select your landscape
- Under Collision settings change “Collision Presets” to “Custom…”
- In the details panel find your collision, set your “Collision Presets” to “Custom…”
- Set “Landscape” to Block
N.B., if you are using world partition select ALL objects LandscapeStreamingProxy.

N.B., Remember to add the fade interface to the objects you want to fade under the camera.
Step 1: Add Trace Channel
- Go to Edit > Project Settings
- In Project Settings go to “Collision” (under Engine)
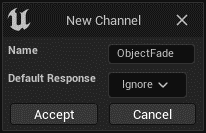
- Select “New Trace Channel”

- Name the trace channel what you want (I named my “ObjectFade”)
- Set the Default Response to “Ignore”
Step 2: Update Pawn
- Open the pawn
- Make sure “(self)” is selected
- Make sure Class Defaults is selected
- Go to Settings>Camera>”MaterialFade”
- Under “Camera Fade Channel” Select the new channel you made (in my case “ObjectFade”)

- Select “Collision Sphere” from the left
- In the details panner find your collision, set your “Collision Presets” to “Custom…”
- Set “ObjectFade” to Ignore.

Step 3: Update Objects
This step should be repeated for all relevant objects you want to fade. This also assumes that you have correctly applied the interface to the relevant actors (see instructions on how to set up a new fade object).
- Select the root of the actor you want to fade (I am using a duplicate of the moving object).
- Go to Collisions, set “Collision Presets” to “Custom…”
- Set “ObjectFade” to Block
N.B., the static mesh (or mesh) has to have collisions for this to work
Step 1: Add Interface
- If you have an actor you want to apply this to go to the next step. If you are just testing this feature out and do not want to apply to an existing actor, create a new actor (or derived) blueprint.
- You need at least 1 static mesh.
- Go to “Class Settings”
- Under interfaces select “add” and look for “RTSCamera” and select “RTSCameraFadeInterface”
Step 2: Implement interface events
- Double click “Set Material” from the interface panel (right click and select implement event if you don’t automatically get the event)
- Pull from “target” and search “Set Material” – you want the one with tooltip that reads “Changes the material applied to an element of the mesh.”
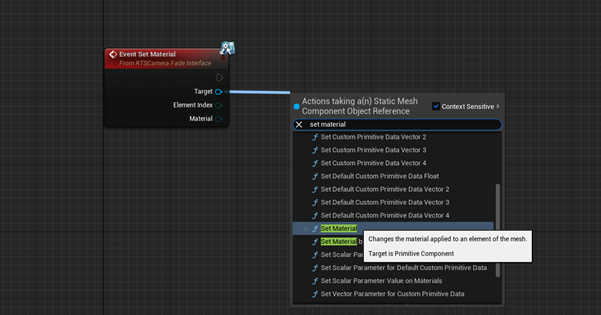
- Plug the corresponding pins from the event into the SetMaterial function (this interface event is just a wrapper).
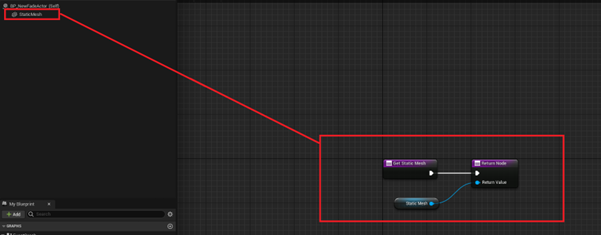
- Double Click “Get Static Mesh”
- Drag and drop (as a getter) your static mesh from the components panel, and plug this into the return.
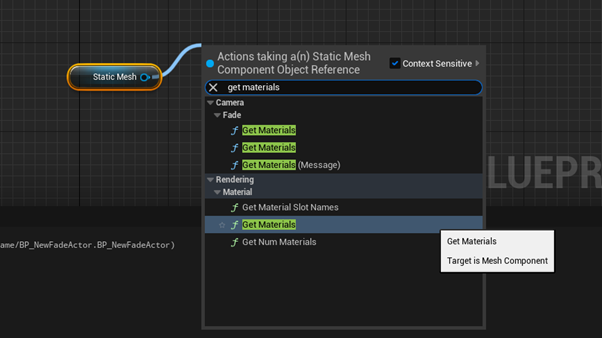
- Double click “Get Materials”
- Drag and drop (as a getter) your static mesh from the components panel and search for get materials (you want the one under “rendering”)
Step 4: Channel
- Make sure the object is set to block on the channel you are using for object fade (see “Adding Custom Trace Channel for Material Fade”).
Sadly, for this feature I cannot give much of a tutorial. I will give you the basic steps and things to be mindful for.
- Select the pawn BP “(self)”, make sure class defaults are selected.
- Go to Camera->ObjectTracking
- Click the “+” symbol by “ObjectsToTrack”
- Select the appropriate object for what you want to track. Your camera will now track all objects of that type.
Note, while tracking objects camera height adjustments are disabled.
